www.officehelp.biz
| www.officehelp.biz |
Office Tutorials & Software Solutions |
| Specializing in Advanced Spreadsheet & Office Macro Solutions. |
|
| Custom GANTT Charts for Microsoft® Excel® |
| Application | Microsoft Excel | Version | 5.00 |
| Author | OfficeHelp | ||
| Tested on versions: | 2000 (9.0), XP (10.0), 2003 (11.0), 2007 (12.0), 2010 (14.0), 2013, 2016 - should work on any version from Office 97 | ||
| Generate Project Style Calendar Plans/GANTT Charts from a task list and associated details with Custom GANTT Charts for Microsoft® Office Excel®. Includes advanced features like multiple chart types, DEPENDENCIES management & calculation, Multiple-period taskbars, detail filtering, optional fields, extra information, Customization & Localization and Microsoft® Outlook® integration. Runs in Excel, no installation required. FULL REBRANDING option. Really EASY project management - If you know Excel, you know this! |
|
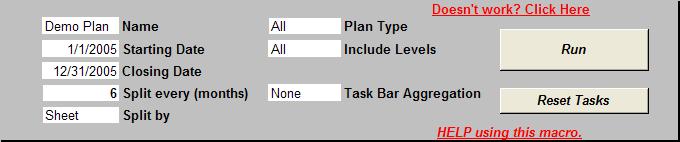
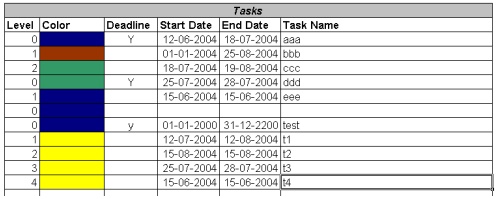
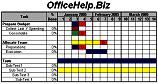
HELP Index FAQ - Frequently Asked Questions Help - The button doesn't work but there are no warnings If you can open the Microsoft Excel file (both the DEMO and/or the commercial version) and get no warnings but the button just won't work, you have Macro support disabled. Please refer (click here) to our article on Macro security issues for information on how to configure Microsoft Office Macro security settings. Why do I get a Macro security warning when opening the Plan Generator / GANTT Chart maker ? There are no security risks associated with this Macro! However, a generic warning message will be displayed on most systems, when opening any macro. Macros may also be disabled. For a general overview of Macro security issues, read this article. How do I get Support ? Use the Support Contact Us page on this website. No registration is necessary. Clearly describe your problem and contact details. We will get in touch with you ASAP. Also, the generic Contact Us page is present at the top of EVERY page on this website . Click here to jump to it. There is Help on the macro file itself. Check the "Help", "How Dependencies Work" and "Macro Configuration" sheets on the Macro file. How do I INSTALL this Macro ? This is an Excel file and requires no software installation. Just open it in Excel and run it by clicking on the Run button. This macro with supplied ready to run with sample data. Clicking on the Run button should activate it with the default options and sample data. If nothing happens when you click on the Run button, please check your macro settings (For a general overview of Macro security issues, read this article). What Excel versions are supported ? This macro is compatible and have been tested on ALL Excel versions from Excel 97 to Excel 2010 (not yet commercially available). It will automatically detect the latest versions (Excel 2007 and Excel 2010, when available) and use some extra features like allowing more than 256 columns to be used (previous versions of Excel can only have 256 columns on a single sheet). How to use it? This macro with supplied ready to run with sample data. Clicking on the Run button should activate it with the default options and sample data. Relating the output with the sample data should be straightforward. Just replace the supplied sample data with your own data and run it again. To create a new Planning Calendar / GANTT Chart, follow this steps on the INPUT Excel sheet: 1) Erase the sample data supplied with the file - Click the Reset button to delete ALL tasks on the task list. You need to confirm TWICE the action. All existing Tasks will be PERMANENTLY ERASED. 2) Fill in the general (header) input fields (PIC. 1):
PIC. 1 - Header Input Fields 3) Fill the task details on the Tasks table (PIC. 2):
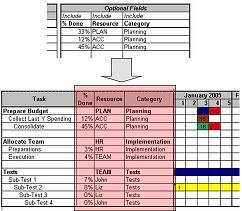
PIC. 2 - Tasks details table 4) Press the Run button on the header to generate the calendar. 5) If not satisfied, close (dump it) the Calendar workbook generated by the macro, change the details you want and generate a new calendar with the corrected details! 6) When satisfied, save the calendar to the disk. You can now make manual changes, multiple copies and work with it as any other regular Microsoft Excel file! Can I stop the macro while it's running? Yes. Press the ESC key and it will stop with a warning message that it was interrupted before finishing generating the calendar. Can I make all calendars at once? Yes, of course. Just select "All" on the Plan Type box. More information about the options available below under DEFINITIONS. What about the Optional Fields? There are 10 optional fields that can be used or not (toggle the Include / Exclude field on top of its label - row 34). Their labels can also be changed (row 35):
It is possible to change both 10 labels by entering new labels into cells from L35 to U35. These columns are optional because they can be disabled by changing cells L34 to U34.If they are set to "Exclude" then the column will not be used on the plan. By default, optional fields are grouped and can be opened / closed on the output file. This setting can be changed on the CONFIG sheet (cell H22).
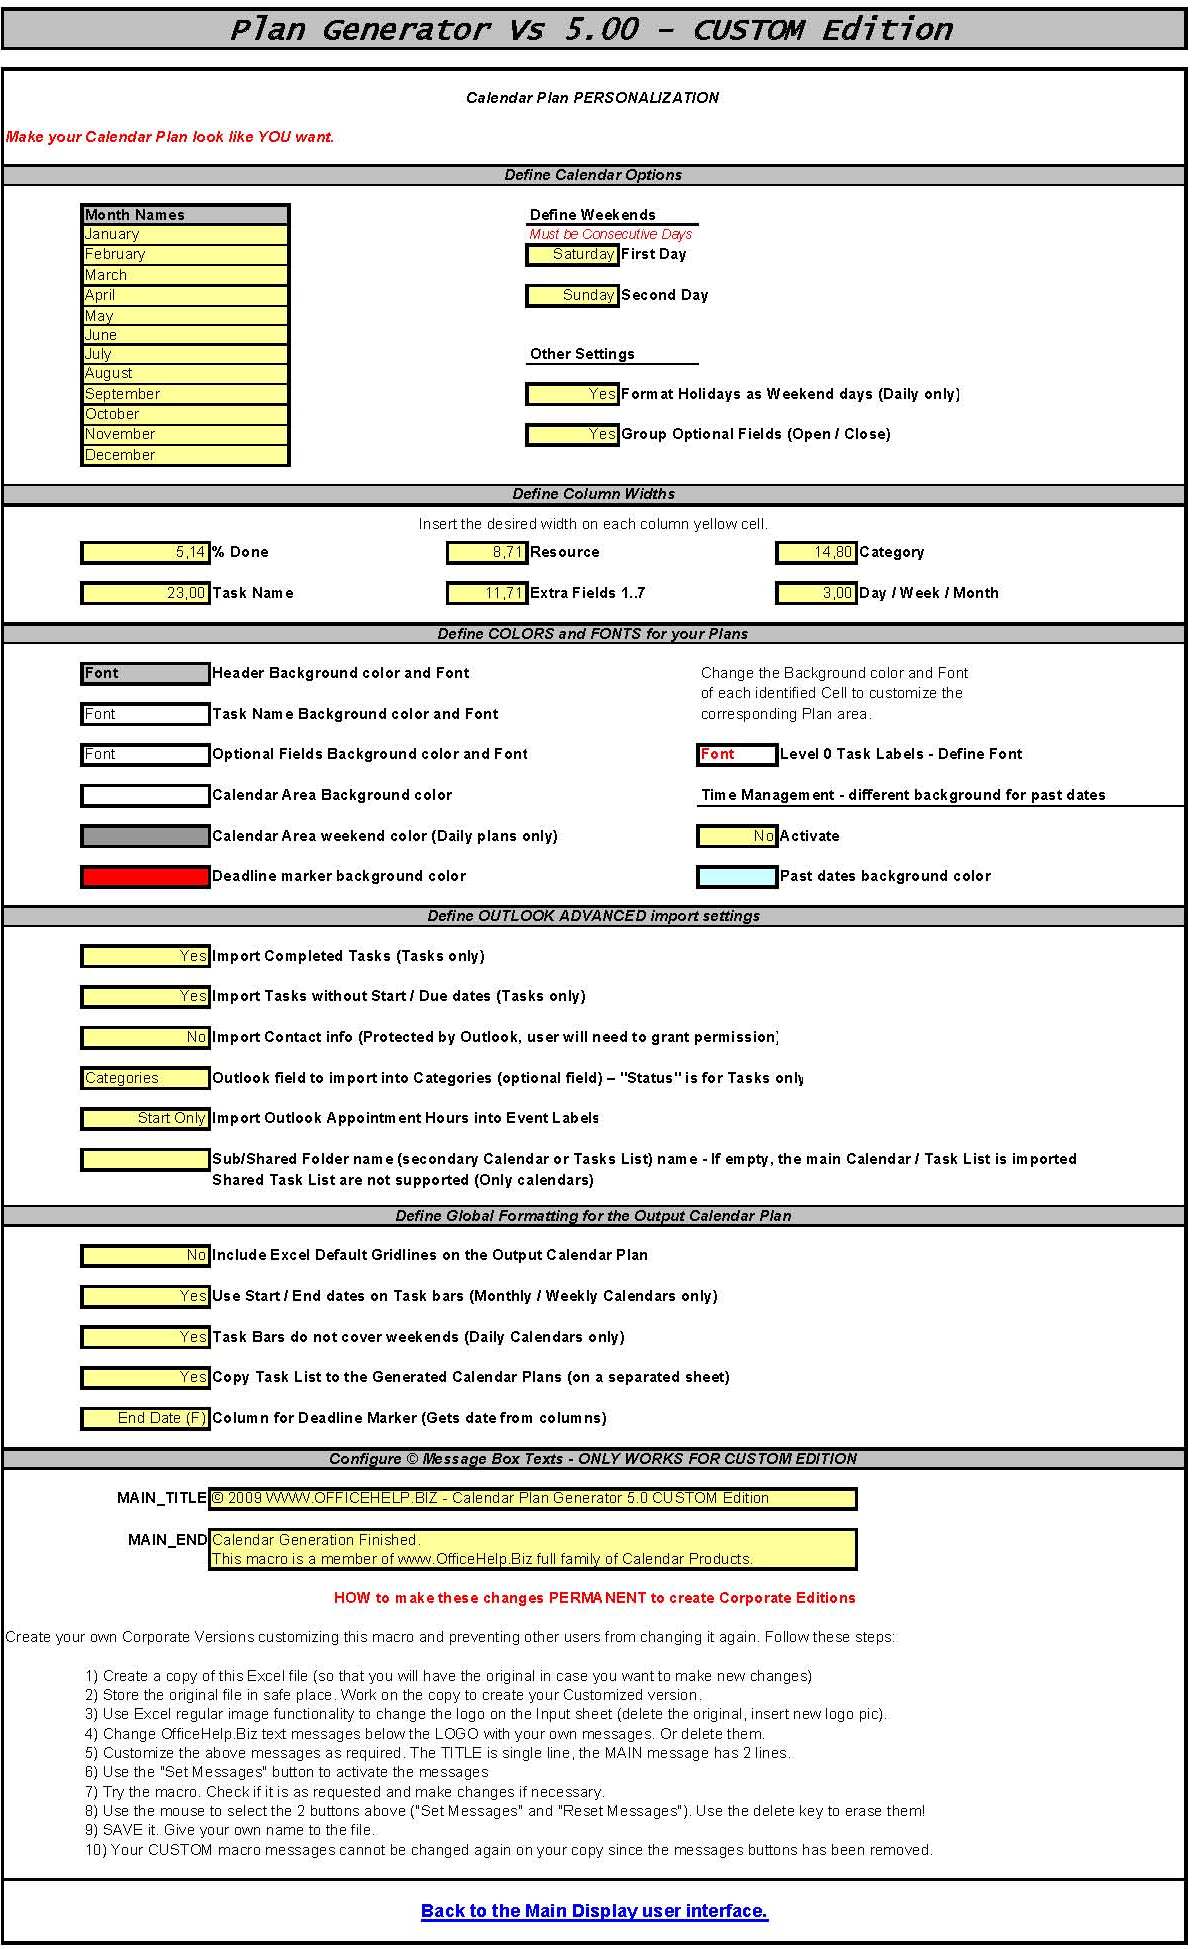
PIC. 3 - Optional Fields What are the customization options of the CONFIG sheet? The CONFIG sheet allows for several customizations of the Calendar Plans / GANTT Charts generated by the macro:
How to Import OUTLOOK Calendar and Tasks To import Outlook Calendar or Tasks, all you need to do is to run the macro on the PC where the Outlook you want to sync is installed, and with the same account. For most cases, all you need to do is select the source and press the "Import Outlook" button. On the INPUT sheet:
There are also some ADVANCED SETTINGS on the Config sheet:
Holiday Management (Holidays Sheet) - How to use the Holidays manager On the Holidays sheet, you may manually enter all Holidays and other non-working days - or enter the Year and automatically add the Holidays to the list (for the USA, the only country currently supported) . Holidays are also used for the new worksheet functions supplied by the macro (check the Holidays sheet for details). Task Bar Aggregation - Create Multiple-Period Taskbars on a single row By default, the macro will create one task bar for each row (task) on the task list. However, sometimes a single task bar with multiple periods would be better. Example: Employee holidays: If one employee has 5 holiday blocks in a year, it's best to show them as a single row with 5 periods (task bars) than 5 rows. Each task / block always has to be entered separately on the Tasks list. It is however possible to aggregate them into single row / multiple period bars. Aggregation is defined on the "Task Bar Aggregation" (Cell F11) on the Input Sheet, which can be set to:
By Default, task bar aggregation if set to None (Disabled). Each task on the calendar will use a separated row. DEPENDENCIES MANAGEMENT - How Dependencies Work There is Help on the macro file itself. Check the "Help", "How Dependencies Work" and "Macro Configuration" sheets on the Macro file. Dependent Tasks are tasks whose Start and End Date depend on other ("master") task. If the master task changed, the dependent task adjusts itself. The Dependencies Manager feature enables the creation and automatic management of Dependent Tasks. It is still possible, as in earlier versions, to enter non-dependent talks by manually entering their Start and End date. AUTOMATIC (Default) and MANUAL calculation modes The Dependencies Manager can be set to calculate dependencies in 2 modes, as defined on Cell I25 on the “Input” sheet. By default it is in Automatic mode, meaning that, whenever a task is changed, it will immediately adjust the Start and End date on all related tasks. This is usually preferred, as the effect of a change can be immediately verified. However, on long task lists with many interdependencies, it may become slow. If this is the case, the calculation mode may be turned into Manual, and task dependencies will only be calculated when the Calculate Dependencies button is used. The Calculate Dependencies button works in both Automatic and Manual modes, but should not be necessary on the Automatic mode as dependencies update themselves every time a task changes. Task Duration: Days or Working Days. Task Duration, necessary to calculate its End Date, can be set to 2 options on cell I35 on the Input sheet:
End Dates are calculated from the Start Date, adding the necessary number of consecutive or working days. EXAMPLE: If the Start Date is a Thursday, weekends are defined as Saturday & Sunday (can be changed of the CONFIG sheet), no holidays are defined and Task Duration is 5 days, result will be:
Weekends can be defined on the Config sheet. Holidays can be defined on the Holidays sheet. How to Use the Dependencies Manager - Creating Dependencies Dependencies are created by linking one task to another existing one. When the original task changes, so does the dependent one. The Start Date of the Dependent Task will be the same as the End Date of the Original Task (Dependent tasks can only start when the original task they are dependent upon are finished). To create a Dependent Task, just enter the Row Number of the original task into the cell in Column J on the row of the Dependent Task. EXAMPLE: If the task on row 60 is dependent on the task on Row 38, enter 38 on the cell J60. How to Use the Dependencies Manager - Entering Dates & Durations Several combinations are possible to enter Task calendar details: Start Date, End Date & Duration
When End Dates are calculated, the result will be dependent on the Duration unit (Days or Working Days). There is Help on the macro file itself. Check the "Help", "How Dependencies Work" and "Macro Configuration" sheets on the Macro file. What are Daily Calendar Plans? Daily Calendar Plans are calendar plans with a column for each separated day in the calendar main interval. This gives maximum detail but produces long calendars for large periods. Better for smaller periods, when details are important. What are Weekly Calendar Plans? Weekly Calendar Plans are calendar plans with a column for each separated week in the calendar main interval. This gives less detail but produces compact calendars for larger periods. Better for larger periods, when the "big picture" is important. What are Monthly Calendar Plans? Monthly Calendar Plans are calendar plans with a column for each separated month in the calendar main interval. This gives less detail but produces compact calendars for larger periods. Better for really large periods, when the "big picture" is important. What are Yearly Calendar Plans? A completely new style of calendars. They present full years on matrix of Months vs Days and therefore need no external legend for the tasks. But it is a very convenient format for year long events like meetings, holidays, vacations and long plans like software roll-outs. Automatic Calendar Split Excel versions up to Excel 2007 had a built in limit of 256 columns. Since it uses a column for each day/week, and some columns are used for data and formatting, you cannot have calendars longer than 253 days/weeks. Very long calendars can also be impossible to read once printed. The Calendar macro will warn you if the calendar reach the limits and propose an automatic split of the calendar into several plans. For your convenience, each calendar will have the task headings and splits are automatically made at the last full month. No months will be split in the middle. Excel 2007/2010: This macro will detect Excel 2007 / 2010 and allow the additional columns above 256 to be used. Full year daily calendars are allowed without splitting. What is the "Split Every (months)" option? Instead of having very long calendars, you can have them split for you, automatically, every N months. You have to select a value from the list supplied, other values will not work (cell C11). What is the "Split by" option? If your calendar plan is split, you can opt for each calendar plan to be made on the same sheet (having them all together and pre-formatted for the printer) or separated on an Excel Workbook for each. Same sheet is the default option (cell C13). WARNING: On Free DEMO Editions, the All option disables the Split By (months) field. Instead, the optimum selection for the Plan Demos in each case is used. Split By (months) will work for individual plan types. What is the "Include Levels" option? If you have a Task list with several levels (0,1,2…), it will not make sense to use all tasks on all calendars. In a Monthly or Weekly calendar it may make sense to eliminate the details and use only top-level (0,1..) tasks. On a daily calendar, it makes sense to include all tasks. With this filter, YOU choose what level of detail to include (cell F7). What is the "Reset Tasks" button? The Reset tasks button will delete ALL tasks on the task list. Therefore, you have to confirm TWICE the action. All existing Tasks will be PERMANENTLY ERASED. Can I change the resulting plan ? Of course. It's an Excel Sheet like any other. There is nothing special once it's generated, only colored cells and data. Can I save the Plan Generator with the Plan Data ? Can I have several copies ? Again, of course. It's a regular Excel file. There are NO MACROS on the resulting plan, only on the generator file. Can I personalize the POP-UP messages? YES, but only on the future CUSTOM EDITION or SOURCE CODE EDITION. Check the Config sheet for details (Try the FREE Demo). Can I leave a Blank line between tasks? Yes, just enter a level 0 blank task (no data or name). The supplied sample data has one (line 19). How does the Plan Generator knows when the tasks end? The macro will stop on the first task line with no data on the task level. So if you leave the task level empty on a line, it will stop there even if more tasks exist after that line. Can I import Tasks lists from Version 3.0 or below? Yes. Just copy/paste the task list into version 4 or above. The fixed columns are the same, so it will work. You CANNOT import the optional fields because they didn't exist on previous versions. |
(c) 2004 - 2026 OfficeHelp.Biz